CSS3多列、用户界面、伪类和伪元素
多列
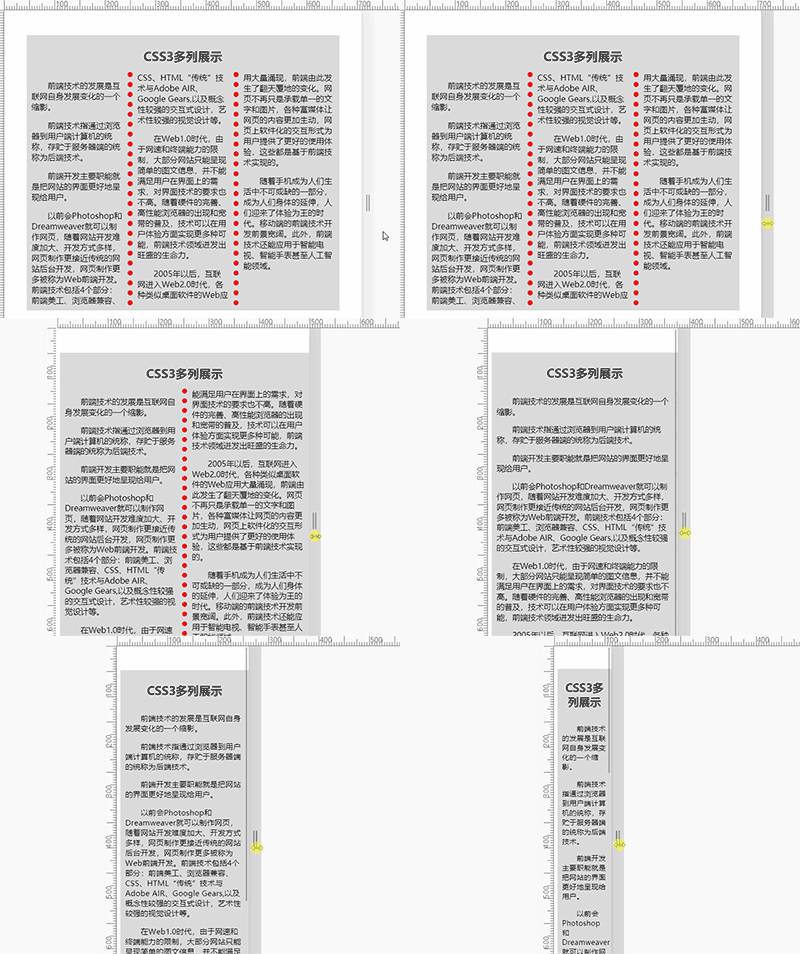
在CSS3中,我们可以使用column-count或者column-width来将原本一列排列的内容分成多列展示。
-
column-count: 指定元素被分隔的列数。 -
column-gap: 指定列间的间隔。 -
column-width: 建议一个最佳列宽。 列宽是在添加另一列之前列将成为最大宽度。。 -
columns:column-width和column-count的简写形式; -
column-rule:column-width、column-style和column-color的简写形式,表示在列与列之间添加分割线(规则与border一致
column-rule-width: 设置列之间分割线的宽度规则
column-rule-style: 设置列之间分割线的样式规则
column-rule-color: 设置列之间分割线的颜色规则
-
column-span: 元素应横跨几列(1 | all)
-
column-fill: 规定如何填充列,主流浏览器都不支持
css
.wrapper {
width: 600px;
margin: 50px auto;
padding: 10px;
background: #dedede;
overflow: hidden;
-webkit-column-count: 3;
-moz-column-count: 3;
column-count: 3;
-webkit-column-rule: 10px dotted red;
-moz-column-rule: 10px dotted red;
column-rule: 10px dotted red;
column-gap: 30px;
}
@media (max-width: 600px) {
.wrapper {
width: 100%;
-webkit-column-width: 200px;
-moz-colulmn-width: 200px;
column-width: 200px;
}
}
.title {
text-align: center;
font-size: 24px;
-webkit-column-span: all;
column-span: all;
}
.content {
text-indent: 2em;
}
html
<div class="wrapper">
<h1 class="title">CSS3多列展示</h1>
<div class="content">
<p>
前端技术的发展是互联网自身发展变化的一个缩影。
</p>
...
</div>
</div>
用户界面
box-sizing
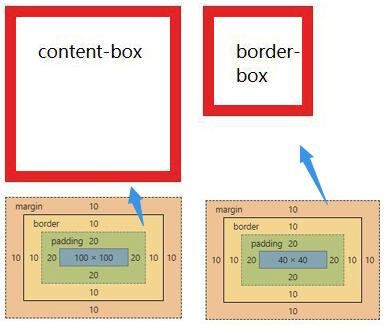
定义了应该如何计算一个元素的总宽度和总高度。
box-sizing: content-box | border-box;
-
content-box:默认值,标准的盒模型,width与height只包含内容的宽度和高度。width = 内容的宽度
height = 内容的高度 -
border-box:IE的怪异盒模型。width = border + padding + 内容的宽度
height = border + padding + 内容的高度
css
.box {
float: left;
width: 100px;
height: 100px;
margin: 10px;
padding: 20px;
border: 10px solid red;
}
.content-box {
box-sizing: content-box;
}
.border-box {
box-sizing: border-box;
}
html
<div class="box content-box">content-box</div>
<div class="box border-box">border-box</div>
outline-offset
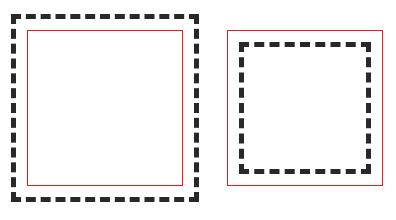
对outline轮廓进行偏移,也就是该轮廓与元素边缘或边框之间的距离值。
css
.box {
float: left;
width: 100px;
height: 100px;
margin: 20px;
padding: 20px;
border: 1px solid red;
outline: 5px dashed #2c2c2c;
}
.box1 {
outline-offset: 10px;
}
.box2 {
outline-offset: -1em;
}
resize
是否允许用户调整元素的尺寸。
- none:用户无法调整元素的尺寸。
- both:用户可调整元素的高度和宽度。
- horizontal:用户可调整元素的宽度。
- vertical:用户可调整元素的高度。
注意:如果一个块级元素的overflow属性被设置成了visible,那么resize属性对该元素无效。
css
overflow: hidden;
resize: both;
appearance
允许您将元素设置为标准用户界面元素的外观。(目前主流浏览器都不支持)
icon
目前没有浏览器支持
nav-down、nav-right、nav-up、nav-left和nav-index
目前只有Opera支持。
伪类
添加到选择器的关键字,指定要选择的元素的特殊状态。
:root
代表文档的根元素,等同于html元素
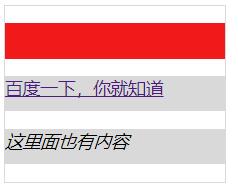
:empty
代表没有子元素的元素
css
.wrapper {
width: 200px;
border: 1px solid #ddd;
}
p {
height: 32px;
background-color: #ddd;
}
p:empty {
background-color: red;
}
html
<div class="wrapper">
<p></p>
<p>
<a href="http://www.baidu.com">百度一下,你就知道</a>
</p>
<p>
<em>这里面也有内容</em>
</p>
</div>
:target
选取当前活动的目标元素
当前的url: http://test.xxx.com/index.html#test对应下面的元素<div id="test">这个元素会被选中</div>会被选中。
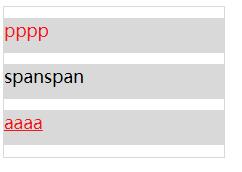
:not(selector)
代表除selector元素以外的元素。
css
.wrapper {
width: 200px;
border: 1px solid #ddd;
}
.wrapper > * {
display: block;
height: 32px;
margin: 10px 0;
background-color: #ddd;
}
.wrapper :not(span) {
color: red;
}
html
<div class="wrapper">
<p>pppp</p>
<span>spanspan</span>
<a href="#">aaaa</a>
</div>
:enabled
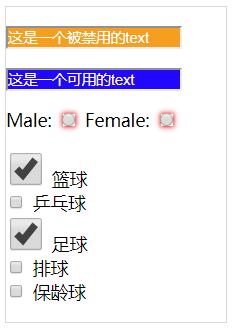
代表可启用的元素。如果一个元素能被激活(如选择、点击或接受文本输入)或获取焦点,则该元素是可启用的。
:disabled
代表禁用的表单元素。
:checked
选择被选中的元素(如radio,checkbox、option)。
:indeterminate
表示状态不确定的表单元素:
<input type="checkbox">元素,其indeterminate属性被JavaScript设置为true。<input type="radio">元素, 表单中拥有相同name值的所有单选按钮都未被选中时。- 处于不确定状态的
<progress>元素
css
.wrapper {
width: 200px;
border: 1px solid #ddd;
}
:enabled {
color: #fff;
background-color: blue;
}
:disabled {
color: #fff;
background-color: orange;
}
:checked {
width: 30px;
height: 30px;
}
:indeterminate {
box-shadow: 0 0 5px red;
}
html
<div class="wrapper">
<p>
<input type="text" disabled value="这是一个被禁用的text" />
</p>
<p>
<input type="text" value="这是一个可用的text" />
</p>
<p>
<label for="male">Male: </label>
<input type="radio" name="sex" id="male">
<label for="Female">Female: </label>
<input type="radio" name="sex" id="female">
</p>
<p>
<input type="checkbox" name="hobbies" checked> 篮球
<br>
<input type="checkbox" name="hobbies"> 乒乓球
<br>
<input type="checkbox" name="hobbies" checked> 足球
<br>
<input type="checkbox" name="hobbies"> 排球
<br>
<input type="checkbox" name="hobbies"> 保龄球
</p>
</div>
:nth-child(n)
匹配兄弟元素中的第n个元素。
n: 第n项odd: 奇数项even: 偶数项3n+1: 符合3n+1规则的所有项
:nth-last-child(n)。
匹配兄弟元素中的倒数第n个元素。
:first-child
匹配兄弟元素中的第一个元素
:last-child
匹配兄弟元素中的最后一个元素
:only-child
匹配同级下面仅有的一个元素(它没有任何的兄弟元素)
下面代码中那三个类名为only-child的元素会被匹配到
html
<div class="test">
<span class="only-child">这个会被匹配到</span>
</div>
<div class="test">
<div>
test
<div class="only-child">
<span>这个</span>
<b>也会</b>
<i>被匹配</i>
</div>
</div>
<ul>
<li class="only-child">这个会被匹配到</li>
</ul>
<ul>
<li>xxx</li>
<li>xxxx</li>
</ul>
</div>
:nth-of-type(n)
匹配同类型兄弟元素中的第n个元素
n: 第n项odd: 奇数项even: 偶数项3n+1: 符合3n+1规则的所有项
:nth-last-of-type(n)
匹配同类型兄弟元素中的倒数第n个元素
:first-of-type
匹配同类型兄弟元素中的第一个元素
:last-of-type
匹配同类型兄弟元素中的最后一个元素
:only-of-type
匹配兄弟元素中类型唯一的元素(它可以有兄弟元素,但是不能是相同类型的)
伪元素
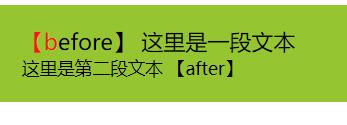
::after
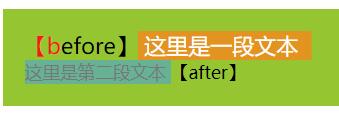
创建一个伪元素,作为选中元素中的最后一个子元素。这个伪元素默认是行内元素。通常会配合content属性来为该元素添加装饰内容。
::before
创建一个伪元素,作为选中元素中的第一个子元素。这个伪元素默认是行内元素。通常会配合content属性来为该元素添加装饰内容。
::first-letter
会选中某块级元素第一行的第一个字母,并且文字所处的行之前没有其他内容(如图片和内联的表格) 。
::first-line
在某块级元素的第一行应用样式。第一行的长度取决于很多因素,包括元素宽度,文档宽度和文本的文字大小。
注意:margin-left属性在::first-line中不生效。
::selection
应用于文档中被用户高亮的部分(比如使用鼠标或其他选择设备选中的部分)。
css
.box {
padding: 20px;
background: yellowgreen;
}
.box::before {
content: '【before】';
}
.box::after {
content: '【after】';
}
.box::first-letter {
color: red;
}
.box::first-line {
font-size: 20px;
}
.box::selection {
background: orange;
color: #fff;
}
.box span::selection {
background: skyblue;
color: gray;
}
html
<div class="box">
这里是一段文本
<br >
<span>
这里是第二段文本
</span>
</div>
选中时的状态
