解决Canvas绘制模糊问题
有时候,我们在使用 canvas 画图时,在某些设备上会出现模糊的现象。
情景模拟
看以下代码:
html
<canvas
id="canvas"
width="250"
height="250"
style="border: 1px solid #000;"
></canvas>
<script>
const canvas = document.querySelector('#canvas')
const ctx = canvas.getContext('2d')
const color = '#000'
for (let i = 1; i <= 4; i++) {
ctx.beginPath()
ctx.moveTo(50 * i, 50)
ctx.lineTo(50 * i, 200)
ctx.lineWidth = i
ctx.strokeStyle = color
ctx.stroke()
}
</script>
HTML 中放置了一个 canvas 元素,它的宽度高均为 250px,并带着 1px 的黑色边框。然后通过 js 在里面分别绘制了线宽为 1px、2px、3px 和 4px 且描边均为黑色的直线。
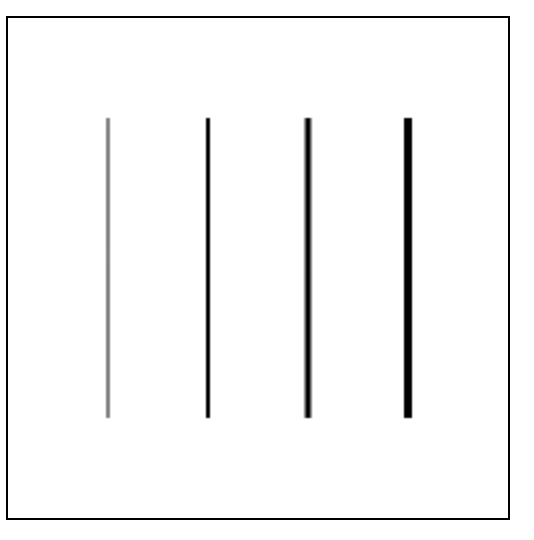
下面是在我现在电脑上显示的结果截图:

从图片上可以看到,第一条直线明显不够黑;第二条直线的宽度与第一条直线一样;而第三条直线肉眼可看的模糊;第四条直线的宽度与第三条直线的宽度一样。另外,可以看到,通过 css 赋予的 canvas 的边框明显比第一条直线要细。
DPR 是什么?
DPR 全称 device pixel ratio,也就是设备像素比,它是 设备物理像素 和 设备独立像素(device-independent pixels) 的比率。在缩放比率为 100% 的情况下,它是 设备物理像素 和 CSS像素的比率。
- 设备物理像素:一个物理概念,任何设备的物理像素都是固定的;
- 设备独立像素:dips,是一个抽象概念,用于向 CSS 中的宽度、高度、媒体查询和 meta 的 viewport 中的 device-width 提供信息。通过观察 retina 和非 retina 设备之间的区别,可以更好的解释它;
- CSS像素:Web 编程中的一个概念,指 CSS 中使用的逻辑像素。
具体的解释可以了解一下:CSS 像素、物理像素、逻辑像素、设备像素比、PPI、Viewport
在 JS 中,devicePixelRatio 它是挂载在 window 上的一个属性,可以通过以下代码来查看它的值:
js
const dpr = window.devicePixelRatio
console.log(dpr) // 在我现在的设备上显示的是 2
解决 canvas 绘制模糊问题
为了使 dpr 不为 1 的屏幕上也能正常绘制图片,我们需要更正 canvas 的分辨率,做法也很简单:
js
// 1. 获取 canvas 实际的宽 / 高
const { width, height } = canvas
// 2. 设置 css 样式
canvas.style.width = `${width}px`
canvas.style.height = `${height}px`
// 3. 获取 dpr
const dpr = window.devicePixelRatio || 1
// 4. 更正 canvas 的分辨率
canvas.width = Math.floor(width * dpr)
canvas.height = Math.floor(height * dpr)
// 5. 更正 canvas 的坐标系
canvas.getContext('2d').scale(dpr, dpr)
我们给情景模拟中的代码增加一个对比,先增加一个 canvas 元素:
html
<canvas
id="canvas1"
width="250"
height="250"
style="border: 1px solid #000;"
></canvas>
然后在 js 进行和之前一样的绘制操作,当然也需要先更正分辨率:
js
const exactCanvas = document.querySelector('#canvas1')
const exactCtx = exactCanvas.getContext('2d')
// 1. 获取 canvas 实际的宽 / 高
const { width, height } = exactCanvas
// 2. 设置 css 样式
exactCanvas.style.width = `${width}px`
exactCanvas.style.height = `${height}px`
// 3. 获取 dpr
const dpr = window.devicePixelRatio || 1
// 4. 更正 canvas 的分辨率
exactCanvas.width = Math.floor(width * dpr)
exactCanvas.height = Math.floor(height * dpr)
// 5. 更正 canvas 的坐标系
exactCtx.scale(dpr, dpr)
for (let i = 1; i <= 4; i++) {
exactCtx.beginPath()
exactCtx.moveTo(50 * i, 50)
exactCtx.lineTo(50 * i, 200)
exactCtx.lineWidth = i
exactCtx.strokeStyle = color
exactCtx.stroke()
}
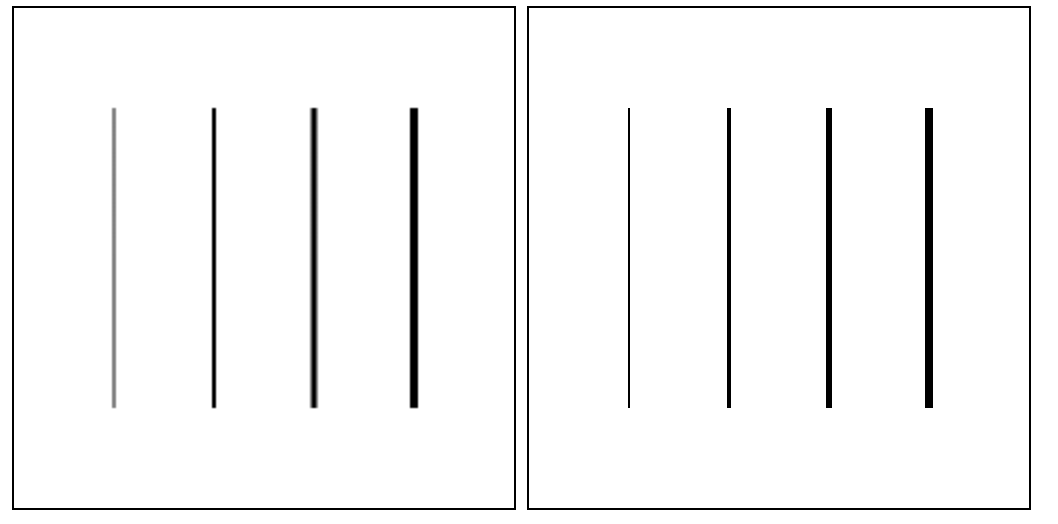
下面是对比展示的效果:

左边的是未更正分辨率的 canvas 绘制出来的,而右边的则是已经更正了分辨率的 canvas 绘制出来的。
至此,我们就解决了 canvas 绘制模糊的问题。
简单地封装一下:
js
function createCanvas (width = 400, height = 300, canvas) {
const c = canvas ?? document.createElement('canvas')
c.style.width = `${width}px`
c.style.height = `${height}px`
const dpr = window.devicePixelRatio ?? 1
c.width = Math.floor(dpr * width)
c.height = Math.floor(dpr * height)
c.getContext('2d').scale(dpr, dpr)
return c
}
